Tag: commercial steel buildings

  • Commercial Metal Building Maintenance That Actually Matters

    Commercial Metal Building Maintenance That Actually Matters

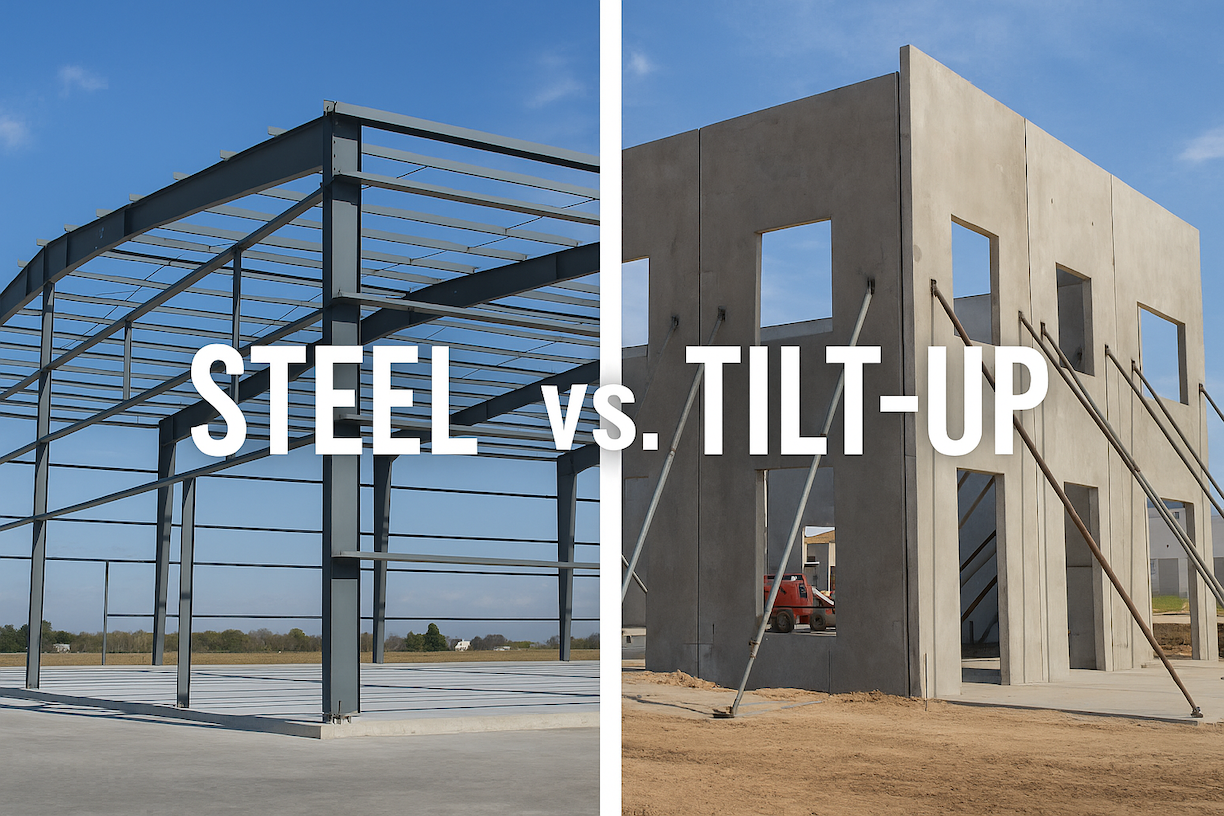
    The maintenance contract sat on Mike’s desk for three months before he signed it. “It’s just a metal building,” he’d told his partner. “What maintenance does steel need?”

    He was mostly right. His metal building required a fraction of the upkeep his previous wood-frame facility demanded. No rot to repair, no termite damage, no painting, no replacing deteriorated materials. But eighteen months of ignoring the few simple tasks that metal buildings do need caught up with him when a preventable roof leak damaged $47,000 worth of inventory.

    The insurance adjuster’s report noted “deferred maintenance” as a contributing factor. The irony? The problem started as a loose fastener, a $200 fix that nobody noticed because nobody looked. Mike had gone from one extreme (constant maintenance on his old building) to the other (assuming his metal building needed none).

    Metal buildings require far less maintenance than traditional construction, but “less” doesn’t mean “zero.” The difference is that the maintenance that actually matters is straightforward, infrequent, and takes minimal time. Quality-engineered buildings make maintenance even simpler by addressing common issues through superior design and components. Smart maintenance protects your investment and prevents the rare problems that can develop when simple tasks get ignored.

    What Actually Needs Attention

    Compared to wood or concrete buildings requiring constant painting, rot repair, foundation maintenance, and structural upkeep, metal buildings need attention in just a few specific areas. Well-engineered buildings minimize even these requirements through quality components, but periodic inspection keeps everything performing as designed.

    Roof fasteners benefit from occasional verification. Walk the roof twice yearly to confirm everything remains secure. This fifteen-minute inspection provides peace of mind and catches the rare issue before it becomes a problem. Quality buildings use premium fasteners that maintain their grip for decades, making this truly just verification rather than constant repair. Check panel seams for any separation – well-installed panels rarely develop issues, but a quick look keeps minor observations from becoming repairs.

    Gutters and downspouts handle enormous water volumes during heavy rain, and clogs create problems extending far beyond the drainage system. Overflowing gutters dump water directly against your foundation, potentially causing settlement or interior moisture problems. Clean gutters at least twice yearly, more often near trees. Properly engineered drainage directs water away from the building, so the main maintenance is simply keeping gutters clear to let the system work as designed.

    Door and window seals eventually need replacement regardless of building type, but quality makes a significant difference in longevity. Buildings engineered with formed base trim and proper closure systems maintain weather-tight seals far longer than those using basic foam closures. Annual inspection identifies any seals showing wear before they fail completely. Replacing worn seals takes minimal time and keeps buildings weather-tight while reducing HVAC costs, a simple task with clear return on investment.

    Panel security deserves an annual walk-around despite quality installation keeping panels secure for decades. Check for any loosened fasteners, particularly on the windward side where wind loads concentrate. Well-engineered buildings sized for local wind loads rarely develop panel issues, but verification takes minutes and identifies any concerns before weather events create problems.

    How Quality Engineering Reduces Maintenance

    Engineering quality and component selection create buildings that need less upkeep over their service life.

    Premium lifetime fasteners that resist corrosion eliminate constant replacement. These fasteners maintain their grip and appearance for decades, turning frequent maintenance into occasional inspection. Proper sealing systems using formed base trim and engineered closures create weather-tight seals lasting years longer than foam closures, meaning less frequent replacement and better energy efficiency.

    Panel warranties of 25-40 years against rust, fading, and chalking reflect actual long-term performance backed by decades of real-world results. Buildings with warranted panels require minimal corrosion maintenance compared to those using basic coatings needing attention within years.

    Design engineered for your specific location’s wind and snow loads means structural components are sized appropriately from the start. This prevents the stress-related issues causing problems in under-designed buildings. When buildings meet or exceed code requirements rather than barely satisfying minimums, maintenance becomes verification rather than constant repair.

    Seasonal Maintenance Priorities

    Breaking maintenance into seasonal tasks creates manageable routines rather than overwhelming annual projects.

    Spring focuses on recovering from winter and preparing for summer. Inspect your roof after winter weather ends, checking fasteners that may have worked loose during freeze-thaw cycles. Clean gutters before spring storms arrive, as winter debris combined with spring rain creates the worst overflow situations. Check HVAC systems before cooling season, changing filters and ensuring proper operation. Walk the exterior looking for winter weather damage, particularly around doors and loading docks where ice and snow accumulate.

    Summer centers on managing heat and preparing for severe weather. Inspect roof coatings and reflective surfaces that control building temperature. Verify overhead doors operate smoothly without binding, as heat exacerbates mechanical issues. Check that ventilation systems work properly, since summer reveals airflow problems. In regions with severe weather, verify all panels remain properly fastened.

    Fall prepares buildings for winter while conditions remain comfortable. Clean gutters and downspouts before leaves accumulate. Inspect door seals and weather stripping before heating season, replacing anything that’s failed. Check your heating system, changing filters and verifying operation before cold weather arrives. Walk the roof looking for any issues that need correction before snow makes repairs difficult.

    Winter emphasizes monitoring rather than active work. Watch for ice dams or excessive snow accumulation on your roof. After significant snow, verify gutters and downspouts haven’t been damaged. Monitor heating system performance and change filters more frequently during heavy-use months. Check for any signs of moisture infiltration or condensation.

    Preventing the Expensive Problems

    Most catastrophic building failures start as minor issues that nobody addressed. Understanding how small problems escalate helps you intervene early when fixes remain cheap and simple.

    Water intrusion causes more building damage than all other issues combined. A single loose roof fastener creates a leak that damages insulation, promotes rust, ruins inventory, and encourages mold growth. The initial fix costs almost nothing, but ignoring it for months or years creates problems that require extensive repairs costing thousands. Check for water stains on interior surfaces, musty odors, or any signs of moisture. These symptoms indicate active problems that need immediate attention before damage compounds.

    Structural damage rarely happens suddenly. Metal buildings telegraph distress through visible signs long before failure occurs. Panels that buckle or show waviness indicate loading problems or fastener failure. Doors that suddenly bind or won’t close properly suggest foundation settlement or frame distortion. Strange noises during wind events point to loose components or structural movement. None of these issues resolve themselves; they only worsen until someone intervenes. Addressing structural concerns immediately prevents minor problems from becoming safety hazards.

    What You Can Handle vs. What Needs Professionals

    Most metal building maintenance falls well within the capabilities of property owners or facility managers. The tasks don’t require specialized tools, technical expertise, or particular physical abilities. Walking the roof to check fasteners, cleaning gutters, inspecting seals, and tightening panels are straightforward work that anyone can handle with basic tools and reasonable caution.

    However, certain situations demand professional expertise. Structural issues like panel buckling, frame distortion, or foundation problems require engineering assessment before repairs begin. Attempting structural fixes without understanding load paths and proper connection methods creates dangerous situations and can worsen existing problems. If you notice structural concerns, call a qualified professional immediately rather than attempting DIY solutions.

    Roof leaks that you can’t locate or that reappear after repair need professional diagnosis. Sometimes water travels far from its entry point before becoming visible, making source identification difficult without experience and proper diagnostic techniques. A professional can find the actual problem rather than treating symptoms.

    Electrical work around metal buildings requires licensed electricians familiar with proper grounding and bonding. Metal buildings conduct electricity, making incorrect electrical work particularly dangerous. HVAC repairs beyond simple filter changes and basic cleaning should involve qualified technicians who understand how these systems interact with metal building characteristics.

    Cost of Neglect vs. Prevention

    The financial case for maintenance is straightforward and compelling. Regular maintenance costs a few hundred dollars annually for most commercial metal buildings. Deferred maintenance that creates major problems costs thousands to tens of thousands when issues finally force action.

    Consider roof maintenance as an example. Walking your roof twice yearly to check and tighten fasteners takes maybe two hours of labor and costs essentially nothing. Ignoring this simple task until leaks develop means replacing damaged insulation ($2,000-$5,000), repairing interior finishes ($3,000-$8,000), replacing ruined inventory (variable but potentially massive), and fixing the roof problem that caused everything ($1,000-$3,000). That’s $6,000-$16,000 plus inventory losses to avoid spending a few hours on preventive work.

    The maintenance vs. neglect calculation always favors prevention. Problems discovered early cost less to fix, create less collateral damage, and cause less operational disruption. Regular maintenance also extends your building’s service life, protecting your capital investment and maintaining property value.

    Frequently Asked Questions

    How often should I inspect my commercial metal building? Conduct basic visual inspections quarterly, walking the interior and exterior looking for obvious problems. Perform detailed roof inspections twice yearly, ideally in spring and fall. Clean gutters at least twice yearly, more often if trees are nearby. Check door and window seals annually and replace anything showing wear.

    What maintenance does a metal building need that traditional buildings don’t? Metal buildings actually require less maintenance overall. The main difference is periodic roof inspection to verify fasteners remain secure, since metal experiences thermal expansion and contraction. It’s a quick check rather than intensive work. Traditional buildings don’t have this specific requirement but need extensive maintenance on rot, painting, and structural systems that metal buildings avoid entirely.

    Can I walk on my metal roof safely? Yes, with proper precautions. Wear soft-soled shoes to avoid damaging panels, step on the panel ridges or purlins rather than the flat areas between them, and use appropriate fall protection on steep roofs or high buildings. If you’re uncomfortable with heights or roof access, hire professionals for roof inspections.

    How do I know if a problem needs professional help? Call professionals for structural issues, persistent leaks you can’t locate, extensive corrosion, electrical work, or HVAC repairs beyond basic maintenance. Handle routine inspection, gutter cleaning, seal replacement, and fastener tightening yourself unless you lack time or ability.

    Does metal building maintenance differ by climate? Yes, somewhat. Buildings in coastal areas need more frequent corrosion checks. Snow-country buildings require more attention to roof loads and ice management. Hot climates demand better seal maintenance since temperature extremes degrade materials faster. The core tasks remain the same; frequency and emphasis shift based on local conditions.

    Protect Your Investment

    Commercial metal buildings deliver decades of reliable service with minimal maintenance compared to traditional construction. The key is doing that minimal maintenance consistently rather than ignoring your building until problems force attention.

    Focus on the systems that matter: roof integrity, water management, seals, and fasteners. Address small issues immediately before they become expensive problems. Schedule seasonal maintenance rather than waiting for failures. The time and money investment is modest, and the protection it provides is substantial.

    Ready to build a low-maintenance commercial facility? Contact MBMI to discuss metal building systems designed for long-term performance with minimal upkeep. Our buildings make maintenance simple by using quality components and proven designs that stand up to decades of use.

    We build for the long term.

  • Steel Building Doors and Windows: Selection Guide for Commercial Buildings

    Steel Building Doors and Windows: Selection Guide for Commercial Buildings

    The architect’s preliminary drawings showed six overhead doors on the warehouse. All the same size. All evenly spaced. Very symmetrical. Completely wrong for how the operation actually worked.

    “We receive full truckloads on the east side and ship partial orders on the west,” the owner explained. “East needs tall doors for straight-in backing. West needs standard height because we’re loading vans and box trucks, not semis. And that door you put on the north wall? That’s where our neighbor’s building sits 15 feet away. We’ll never use it.”

    The architect had designed doors that looked good on paper. What the business needed was doors that actually worked for their operation.

    Doors and windows aren’t aesthetic choices you make after your building design is complete. They’re functional decisions that affect how your operation works every single day. The right selections improve efficiency, reduce energy costs, and make your facility easier to use. Wrong choices create daily frustrations that cost time and money for years.

    Let’s figure out what actually works for your commercial building.

    Start With How You’ll Actually Use Your Building

    Forget the standard door package for a minute. Walk through a typical day in your operation.

    How do materials arrive? Full truckloads backing into docks need 10×10 or larger overhead doors with dock levelers. Partial shipments from box trucks work fine with 9×9 or 10×10 doors at ground level. Deliveries from cargo vans or pickup trucks only need 8×8 doors.

    How do materials leave? Shipping patterns matter as much as receiving. If you’re loading full pallets into trucks, you need door heights that accommodate forklift operations. If workers carry boxes to vehicles, standard doors work fine.

    What equipment moves in and out? Some operations regularly move equipment between facilities or bring customer equipment in for service. A manufacturing shop that services construction equipment needs very different door sizes than a warehouse that never moves equipment through doors.

    Do people enter through the same doors as materials? Separating personnel entry from material handling improves safety and climate control. A 3×7 walk door costs far less to heat and cool than opening a 10×12 overhead door every time someone enters.

    Your door requirements come from operations, not from what looks balanced on a building elevation drawing.

    Overhead Door Options

    Overhead doors dominate commercial steel buildings because they provide large openings without consuming wall or floor space.

    Sectional Overhead Doors

    These doors roll up in sections along tracks, storing parallel to the ceiling when open. Standard commercial construction uses 24-gauge or 20-gauge steel. The heavier gauge resists damage better in high-traffic operations. Insulated doors with R-values from R-8 to R-18 reduce energy costs in climate-controlled spaces.

    Wind load requirements matter in exposed locations. Coastal areas, open sites, and tall buildings need doors rated for local wind conditions. Coordinate this during initial planning rather than discovering it during permitting.

    Rolling Steel Doors

    Rolling steel doors coil around a drum above the opening. They work well where ceiling space doesn’t accommodate sectional door tracks or where security takes priority. These doors suit warehouses and equipment storage where security matters more than climate control. They cost less than insulated sectional doors but provide minimal thermal performance.

    Hydraulic or Bifold Doors

    Large openings sometimes use hydraulic doors that fold or swing open. Most commercial operations don’t need these specialized systems. When you do need them, it’s because standard overhead doors can’t provide the opening size your operation requires.

    Door Sizing Guidelines

    Door size directly affects functionality and cost. Too small creates daily frustrations. Too large wastes money and energy.

    Loading Dock Doors

    Standard dock-height doors measure 9×9 or 10×10 feet. These accommodate most truck trailers backing into dock levelers. Refrigerated trucks with taller bodies might need 10×12 doors for clearance.

    If your facility receives full truckloads regularly, proper dock door sizing isn’t optional. Undersized doors force drivers to position perfectly, wasting time on every delivery. Oversized doors cost more to purchase and operate without improving function.

    Ground-Level Overhead Doors

    Drive-in access for forklifts or small vehicles typically needs 10×10 or 12×12 doors. If you’re just moving pallets in and out with a forklift, 10×10 provides adequate clearance. Equipment storage for pickup trucks or service vans works better with 12×12 or 14×14 doors.

    Equipment that’s 10 feet wide doesn’t fit comfortably through a 10-foot door. Add 2-3 feet to your equipment width for realistic door sizing. That 8-foot-wide truck needs at least a 10-foot door, preferably 12 feet.

    Personnel Doors

    Walk doors measure 3×7 feet standard. Install these anywhere people regularly enter separate from material handling. Placing walk doors near overhead doors creates convenient access without opening large doors for personnel.

    Some operations add walk doors within overhead doors using personnel wicket doors. This works for occasional use but becomes less convenient with heavy daily foot traffic.

    Window Considerations

    Windows in commercial steel buildings serve specific purposes rather than creating residential-style aesthetics.

    Natural Light Benefits

    Natural lighting reduces electric lighting loads during daytime hours. The energy savings vary dramatically based on window area, orientation, and operation schedules. Facilities operating primarily during daylight hours benefit most from window investment.

    Windows also improve working conditions. People generally prefer spaces with natural light, which can affect productivity and employee satisfaction. The value is real even if it’s hard to quantify precisely.

    Window Location Strategy

    Place windows where they provide value without creating problems. South-facing windows in cold climates gain solar heat during winter, potentially reducing heating costs. That same solar gain becomes a problem in hot climates, increasing cooling loads.

    North-facing windows provide consistent natural light without direct sun and associated heat gain. This works well for climates where cooling costs dominate energy budgets.

    High-mounted windows along walls bring light deep into buildings without consuming valuable wall space at working height. This approach suits warehouses and manufacturing facilities where wall space near the floor serves operational needs.

    Window Performance

    Window performance significantly impacts energy costs in climate-controlled buildings. Low-E coatings, insulated glass, and proper framing reduce heat transfer while maintaining visibility and light transmission. Understanding energy performance ratings for windows helps you compare products based on U-factor, solar heat gain, and visible transmittance.

    Polycarbonate panel windows cost less than insulated glass but provide minimal thermal performance. They suit unconditioned spaces where natural light provides value without justifying insulated glass investment.

    Security Concerns

    Windows create potential security issues. Ground-level windows in unstaffed facilities or high-crime areas invite break-ins. Elevated windows, smaller units, or security glazing address these concerns while still providing natural light.

    Some operations skip windows entirely due to security concerns, valuable inventory exposure, or process requirements. There’s no rule requiring windows in commercial buildings.

    Entry Door Systems

    Personnel entry doors balance accessibility, security, and climate control.

    Commercial Walk Doors

    Standard commercial walk doors use 3×7 foot frames with various materials and security features. Insulated steel doors provide good thermal performance and security. Aluminum storefronts create professional appearance for customer-facing areas.

    Lock types range from simple keyed locks to electronic access control. Consider how access management fits your operation. Small facilities might use simple keys. Larger operations often need electronic systems tracking who enters when.

    Weather sealing matters in climate-controlled buildings. Quality doors with proper thresholds, sweeps, and seals prevent air infiltration that wastes energy and creates comfort problems near entries.

    Accessible Entry Requirements

    The Americans with Disabilities Act and international building codes establish accessibility requirements that affect door selection and placement. These include minimum clear width, maximum opening force, maneuvering clearance, and threshold heights. Planning accessible entries during initial design proves much easier than retrofitting after construction.

    Most facilities need at least one accessible entrance, sometimes more based on building use and occupancy. This affects door hardware, automatic operators, and approach design.

    Special Door Considerations

    Fire-Rated Doors

    Fire separation requirements might mandate fire-rated doors with hourly ratings (3/4-hour, 1-hour, 3-hour) indicating how long they resist fire spread. These doors require specific hardware and closing mechanisms. They cost significantly more than standard doors but aren’t optional when codes require them.

    Insulation Performance

    Insulated doors with higher R-values reduce energy costs in climate-controlled facilities. An uninsulated 10×10 door in a heated Minnesota warehouse loses significant energy. However, if your building isn’t heated or cooled, door insulation provides no value regardless of climate. Match door insulation to whether you’re actually climate-controlling the space, not just geographic location.

    Operator and Control Options

    Automatic door operators range from simple push-button controls to sophisticated systems with remote operation and timers. High-traffic doors justify automation for convenience and energy savings. Less frequently used doors work fine with manual operation. The cost difference is substantial enough to warrant thoughtful decisions.

    Planning Your Door and Window Package

    Work through this systematically before finalizing your building design.

    Map your operations. Where do materials arrive? How do they move through your facility? Where do people enter? What equipment passes through doors? Your operational flow determines door locations and sizes.

    Count openings by type. How many dock doors? Ground-level overhead doors? Personnel doors? Windows for natural light? Getting accurate counts prevents expensive field changes during construction.

    Specify performance requirements. Which doors need insulation? Where do wind ratings matter? What spaces need natural light? What security level do you need? These specifications affect product selection and costs.

    Consider future flexibility. Changing door sizes or locations after construction costs significantly more than getting it right initially. If you’re uncertain about future needs, oversizing doors or including blocking for additional door openings provides options without complete reconstruction later.

    Common Door and Window Mistakes

    Matching door sizes to building aesthetics rather than function creates pretty buildings with impractical operations. That symmetrical door layout looks great in renderings but frustrates workers daily if doors don’t serve actual traffic patterns.

    Undersizing doors by a few feet seems like smart cost savings until you discover equipment doesn’t fit comfortably or trucks can’t back in without perfect positioning. Door size flexibility costs relatively little during construction but fixing undersized doors later costs enormously.

    Ignoring climate control implications of door and window choices leads to uncomfortable spaces and high energy bills. Large uninsulated doors in heated buildings waste massive energy. Too many windows in hot climates create unbearable solar gain.

    Skipping accessible entry planning until the building inspector requires it forces expensive modifications. Planning accessible entries from the start costs far less than retrofitting later.

    Installing cheap doors to save money initially backfires when they require constant maintenance, fail frequently, or waste energy. Quality doors appropriate to your application provide better long-term value than the cheapest options available.

    Frequently Asked Questions

    What’s the most common overhead door size for commercial buildings?

    The 10×10 foot overhead door serves most commercial applications effectively. This size accommodates forklifts, small vehicles, and standard dock operations. Larger operations often use 10×12 or 12×12 doors for additional clearance. Smaller buildings might use 8×8 or 9×9 doors where full-size equipment doesn’t need access.

    Do I need insulated doors if my building is heated or cooled?

    Yes, insulated doors significantly reduce energy costs in climate-controlled buildings. The insulation value pays for itself through energy savings, typically within 3-5 years. Uninsulated doors also create cold or hot spots near the opening, making those areas uncomfortable for workers. The only time to skip door insulation is in unconditioned storage buildings.

    How many windows should a commercial steel building have?

    There’s no standard number. Some facilities benefit from generous windows providing natural light and improved working conditions. Others skip windows entirely due to security concerns, process requirements, or because operations run primarily at night. Base window decisions on your specific needs rather than matching other buildings.

    Can doors and windows be added after my building is complete?

    Yes, but it costs significantly more than including them during construction. Adding doors requires cutting through walls, installing structural framing, and matching finishes. This disrupts operations and costs 2-3 times what the opening would cost during initial construction. Plan door and window locations carefully during design to avoid expensive modifications later.

    What door features are worth the extra cost?

    Wind-rated doors in exposed locations prevent damage and reduce maintenance. Insulation in climate-controlled buildings pays for itself through energy savings. Quality weather sealing prevents air infiltration problems. Photo-eye safety sensors prevent accidents and reduce liability. Avoid cheap components that fail frequently; quality hardware and operators provide much better long-term value.

    Do I need automatic door openers?

    Automatic openers make sense for high-traffic doors opened many times daily. The convenience and energy savings from reduced opening time justify the investment. Low-traffic doors used occasionally work fine with manual operation. Consider automatic openers on main entry doors for accessibility compliance and customer-facing locations for professional appearance.

    Get Your Door and Window Selections Right

    Doors and windows affect how your facility functions every single day. The decisions you make during planning either support efficient operations or create ongoing frustrations that cost time and money for years.

    Start with honest assessment of how your operation actually works. Specify door sizes, locations, and features based on function rather than aesthetics. Invest in quality products appropriate to your application. Consider future flexibility when you’re uncertain about long-term needs.

    Ready to plan your steel building? Contact MBMI to discuss door and window options that match your operational requirements. Our team helps you think through the practical details that make your facility work well from day one.

    We’ll help you get the details right.

  • Steel Building Size Guide: How to Calculate What You Need

    Steel Building Size Guide: How to Calculate What You Need

    “We should probably go with 60 by 80,” Dave told his partner while sketching on a napkin. “That’s what Jim down the road has, and it seems to work for him.”

    Three months after their building went up, they were already running out of room. Turns out Jim’s operation looked similar but worked completely differently. His 60×80 worked because he shipped daily. Dave’s business held inventory for weeks. Jim needed aisle space for one forklift. Dave needed room for two plus a loading area.

    The building was fine. The size calculation was terrible.

    Here’s what nobody tells you: most businesses either overbuild and waste money on space they don’t use, or underbuild and outgrow their facility within two years. The difference comes down to actually calculating your needs rather than guessing based on what sounds reasonable.

    Let’s figure out what size you actually need.

    Start With What You’re Doing

    Forget square footage for a minute. What happens inside your commercial metal building matters more than the dimensions.

    Manufacturing operations need space for equipment, material flow between stations, finished goods staging, and enough clearance that workers aren’t climbing over things. A 10,000 square foot manufacturing facility needs completely different dimensions than a 10,000 square foot warehouse.

    Warehousing and distribution prioritizes storage density, forklift aisle widths, loading dock access, and order picking efficiency. Rack configurations determine your width requirements more than total square footage.

    Retail and showroom spaces balance customer area, inventory storage, and back-office needs. Customer traffic patterns affect layout more than the building size itself.

    Mixed-use facilities combine multiple functions. You might need high-bay storage in back, office space up front, and work areas in between. Each zone has different space requirements that add up to your total building size.

    Start by listing everything that happens in your building. Then figure out how much room each activity actually needs.

    Calculate Your Core Space Requirements

    Work through your space needs systematically rather than guessing at totals.

    Equipment and Workstations

    Don’t just measure equipment footprint. Include clearance for operation, maintenance, and safety zones. A 10-foot lathe needs operator space, material staging, and enough clearance that workers can move safely around it. That 10-foot machine might actually require a 20×15 foot zone when you factor in real working conditions.

    List every piece of equipment with realistic working space around it. Add those numbers up. That’s your equipment footprint baseline.

    Aisles Matter More Than You Think

    Aisles aren’t wasted space, but rather, they’re how your operation actually functions. Forklift aisles need 12-13 feet for standard counterbalance forklifts, narrowing to 8-10 feet for reach trucks. Pedestrian aisles need 3-4 feet minimum, and emergency exits require 44 inches clear per code.

    Calculate based on actual traffic patterns. Main aisles that see constant use need generous width. Secondary aisles can be tighter, but don’t skimp to save a few feet. You’ll regret cramped aisles every single day.

    Storage Space

    How you store materials dramatically affects your space calculations. Floor stacking needs 8-10 square feet per pallet when stacking two high. Selective pallet rack tightens that to 12-15 square feet per pallet, including aisles. High-density systems like drive-in racks achieve 6-8 square feet per pallet but sacrifice easy access.

    Here’s what matters: calculate for peak season inventory, not averages. Running out of storage during your busy period creates far more expensive problems than building slightly larger initially.

    Office and Support Space

    Budget 75-150 square feet per person for private offices, 50-75 for open areas. Add restrooms per code requirements, break rooms for your headcount, and storage for supplies and equipment. These support areas typically consume 15-25% of your total building in mixed-use facilities, less in pure warehousing.

    Add the Growth Buffer

    Here’s where most people mess up. They calculate exactly what they need today and build exactly that much space. Eighteen months later, and they’re cramped.

    The 30% rule works well for most businesses. Calculate your current needs, then add 30% for growth. This provides roughly three years of expansion room for healthy businesses without overbuilding to the point where you’re financing empty space.

    Adjust based on your growth trajectory. Fast-growing operations might need 40-50% buffers. Stable businesses replacing aging facilities might stick with 20-25%. Be honest about your realistic growth rather than optimistic projections that never materialize.

    Consider how growth happens in your operation. Adding equipment? You need floor space. Increasing inventory? You need storage space. Hiring staff? You need office and support space. Different growth patterns require different space allocations.

    One approach: calculate space for your three-year plan rather than current state. You might not fill the building immediately, but you’ll grow into it before needing expansion.

    Account for Building Systems and Choose Smart Dimensions

    The space inside your walls isn’t all usable. Building systems consume square footage. Mechanical rooms, loading docks, and door clearances take up space that doesn’t store inventory or support equipment.

    Steel buildings use clear-span construction with columns only at perimeter walls, maximizing usable interior space. Ceiling height affects storage capacity dramatically: a 40×80 building with 20-foot ceilings holds 40% more pallets than the same footprint with 14-foot ceilings.

    Standard building dimensions come in 10-foot width and length increments. Common commercial sizes:

    • 40×60 (2,400 sq ft): Small shops, equipment storage
    • 50×100 (5,000 sq ft): Light manufacturing, small warehouses
    • 60×120 (7,200 sq ft): Distribution, manufacturing
    • 80×150 (12,000 sq ft): Regional distribution

    Buildings in the 5,000-15,000 square foot range often provide the best cost per square foot. 

    Ceiling height guidelines:

    • Equipment storage, workshops: 12-14 feet minimum
    • Warehousing with pallet rack: 16-20 feet
    • High-density storage: 24-30+ feet

    Adding 4 feet of height costs roughly 8-12% more but can increase storage capacity 25-35%. Height is expensive to change later but cheap to add during initial construction.

    Common Sizing Mistakes

    Building for today instead of tomorrow creates the most headaches. That perfect-fit building becomes cramped the moment business picks up. Add growth space even if it feels wasteful initially.

    Forgetting about aisle space because it “doesn’t store anything” leads to impossibly tight layouts. Generous aisles improve efficiency and safety. Tight aisles create constant frustration.

    Copying someone else’s building because it looks right doesn’t account for operational differences. Your neighbor’s 50×80 might work for them and fail completely for you.

    Minimizing ceiling height to save 10% upfront costs you storage capacity forever. That modest initial saving rarely justifies the permanent limitation.

    Ignoring office and support space until after the building goes up forces you to carve it from your operational area. Plan these spaces from the start rather than losing warehouse space later.

    Do the Math

    Grab a spreadsheet or even just paper. Work through this systematically:

    1. List all equipment/workstations with realistic footprints
    2. Calculate aisle requirements for your specific traffic
    3. Figure storage needs at peak, not average capacity
    4. Add office and support spaces per headcount
    5. Total those up
    6. Add 30% for growth (adjust based on your trajectory)
    7. Add 10% for building systems and inefficiencies

    That number is your working square footage need. Round up to standard building dimensions that make sense for your site.

    Then decide ceiling height based on storage density and equipment requirements. Remember: height is cheap now, expensive later.

    Reality Check Your Numbers

    Walk through your current space or a similar facility. Measure what you actually have and how you actually use it. Does your calculation match reality?

    Talk to others in your industry. What building sizes work well for similar operations? Where did they overbuild or underbuild?

    Consider consulting with someone who designs facilities in your industry. A few hours of professional input often prevents expensive sizing mistakes.

    Frequently Asked Questions

    What’s the most common building size mistake?

    Building too small by not accounting for growth. Most businesses grow into extra space within 2-3 years, but undersized buildings create problems immediately. Adding 30% buffer space prevents outgrowing your facility too quickly while avoiding massive overbuilding.

    How much does building size affect cost per square foot?

    Smaller buildings cost more per square foot, typically $22-28 per square foot for buildings under 3,000 square feet. Medium buildings (5,000-15,000 square feet) run $16-22 per square foot. Large buildings (20,000+ square feet) achieve $14-18 per square foot. The equipment and setup costs spread across more space in larger buildings.

    Can I expand my building later if I undersize it?

    Yes, steel buildings expand relatively easily. However, adding 1,000 square feet later costs more than including that space in your original build. You’ll also face business disruption during construction. Better to build slightly larger now than expand within a few years.

    Should I build bigger than I need to save money expanding later?

    Balance growth planning against carrying costs. Adding 30-50% space for near-term growth makes sense. Building twice what you need because “someday” you’ll use it means financing and maintaining empty space for years. Build for realistic 3-5 year growth, not distant possibilities.

    How do I calculate space if I’m moving from multiple locations?

    Add up square footage from all current locations, then subtract 20-30%. Consolidating locations typically improves efficiency by eliminating duplicate office space, shared loading areas, and more efficient layouts. The combined operation needs less total space than separate locations.

    Does ceiling height really matter that much?

    Yes, especially for warehousing. A 40×80 building with 20-foot ceilings holds 40% more pallets than the same footprint with 14-foot ceilings. The height difference might add $15,000 to construction but adds $30,000+ in storage capacity value. Height is the most cost-effective way to maximize space.

    Size Your Building Right

    The right building size balances current needs, realistic growth, and budget constraints. Too small creates immediate problems. Too large wastes money on space you won’t use for years. The calculation requires honest assessment of how you actually operate, not guesses based on what feels about right.

    Ready to discuss your project? Contact our steel building company to explore building sizes that fit your operation. Our team helps you think through space requirements and growth planning so you build a facility that works now and adapts as your business evolves.

    We’ll help you get the size right the first time.

  • Steel Building Interior Finishing Guide: Walls, Ceilings, and Floors

    Steel Building Interior Finishing Guide: Walls, Ceilings, and Floors

    Tom walked into his newly erected 80×120 warehouse in Atlanta and saw potential everywhere. The steel frame stood strong, the roof was weather-tight, and the concrete floor gleamed. But the exposed metal walls and open ceiling made the space feel cold and unfinished.

    “I need this operational in six weeks,” Tom told his contractor. “Office space up front, climate-controlled storage in the middle, and workshop area in back. What are my options?”

    The answer surprised him. Unlike traditional construction where interior choices get locked in early, commercial steel buildings offer remarkable flexibility in how you finish the interior. You can start basic and upgrade later, finish different zones to different standards, or create a polished environment that rivals any conventional building.

    The key to steel building interior finishing is understanding your options and making smart decisions that align with your operational needs and budget.


    Wall Finishing Options

    Your wall finishing strategy balances aesthetics, functionality, insulation requirements, and budget. Commercial steel buildings support multiple approaches, each suited to different applications and performance requirements.

    Exposed Metal Panels

    Leaving interior walls as exposed metal panels represents the most economical approach. The steel panels that form your building’s exterior create a durable, maintenance-free interior surface requiring no additional materials or labor.

    This approach works well for warehouses, storage facilities, workshops, and any space where temperature control isn’t critical. The metal surface cleans easily, resists damage from forklifts and material handling equipment, and provides decades of service without maintenance.

    However, exposed metal panels offer no insulation value and can create condensation issues in humid climates or temperature-controlled spaces. The industrial appearance works for many commercial applications but may not suit customer-facing areas or office environments.

    Spray Foam Insulation

    Spray foam applied directly to interior metal panels creates an insulated, finished surface in a single application. The foam adheres to the steel panels, providing excellent R-value while sealing air gaps and creating a vapor barrier that prevents condensation.

    This solution excels in climate-controlled warehouses, cold storage facilities, and any application requiring superior thermal performance. The seamless application eliminates the thermal bridging that occurs with batt insulation, potentially reducing energy costs by 30-40% compared to traditional insulation methods.

    Spray foam costs more upfront than other insulation options but often justifies the investment through energy savings and improved performance. The finished white surface reflects light well, brightening the interior and potentially reducing lighting costs. Many commercial operations leave spray foam exposed as the final interior surface, though you can install finished walls over it if desired.

    Insulated Metal Panels

    Insulated metal panels (IMPs) provide factory-manufactured wall systems with foam insulation sandwiched between metal facings. These panels create a finished, insulated wall system in a single installation, offering excellent thermal performance with a clean, professional appearance.

    IMPs work particularly well for temperature-controlled spaces requiring consistent climate control and professional aesthetics. Food processing facilities, pharmaceutical operations, and climate-controlled warehouses commonly use IMPs for their superior insulation properties and easy-to-clean surfaces.

    The higher material cost balances against reduced installation labor compared to traditional framed walls. The panels install quickly, potentially saving weeks on project timelines compared to conventional wall construction.

    Framed Interior Walls

    Traditional framed walls using steel or wood studs with drywall finishing create spaces indistinguishable from conventional construction. This approach suits office areas, showrooms, retail spaces, and anywhere requiring a polished commercial appearance.

    Framing interior walls provides maximum flexibility for running utilities, installing electrical outlets and data connections, and creating the exact aesthetic you want. Insulation fits between studs, and standard drywall finishing techniques create painted surfaces matching any design preference.

    The trade-off involves higher material and labor costs compared to other finishing options. However, for customer-facing areas or spaces where appearance significantly impacts your business, the investment often proves worthwhile.

    Consider mixing approaches based on functional zones. Frame and finish walls in office and customer areas while using spray foam or exposed panels in warehouse and storage zones. This targeted approach optimizes spending without compromising functionality.


    Ceiling Treatment Options

    Ceiling choices dramatically affect acoustics, lighting efficiency, and the overall feel of your space. Steel buildings offer several approaches, each with distinct advantages for different applications.

    Exposed Structure

    Leaving your steel building’s structure exposed creates maximum ceiling height while minimizing costs. The exposed purlins, beams, and roof panels create an industrial aesthetic increasingly popular in modern commercial design.

    This approach works well for retail spaces, breweries, restaurants, gyms, and any business where the industrial look supports your brand. Exposed ceilings also provide easy access to utilities for future modifications or maintenance.

    The main consideration involves acoustics. Hard surfaces throughout create significant sound reflection, potentially making spaces uncomfortably loud. Adding acoustic panels or fabric treatments at strategic locations can mitigate noise issues while maintaining the exposed structure aesthetic.

    Insulated Roof Panels

    Installing insulation directly against your roof panels, similar to spray foam on walls, creates a conditioned space that includes the full building height. This approach works particularly well when you need climate control but want to maintain maximum ceiling height for storage racks, overhead cranes, or material handling equipment.

    Spray foam applied to roof panels provides excellent insulation performance while creating a finished white surface that reflects light effectively. Some operations leave this as the final ceiling treatment, while others add suspended ceiling systems below for improved acoustics or aesthetics.

    Liner Panels

    Liner panels attach to the interior of your roof purlins, creating a finished ceiling below the structural roof. These panels come in various styles and can include insulation backing for improved thermal performance.

    Liner panels offer a clean, finished appearance at a reasonable cost. They provide some acoustic dampening and create a uniform ceiling that conceals utilities and structure. The reduced ceiling height compared to a fully exposed structure rarely causes problems in commercial applications with standard equipment and storage needs.

    Suspended Ceiling Systems

    Traditional suspended ceiling grids with acoustic tiles create the most finished appearance and best acoustic performance. This approach suits office areas, showrooms, and any space where appearance and sound control matter significantly.

    Suspended ceilings provide easy access to utilities above while creating a polished commercial interior. The acoustic tiles dramatically improve sound quality compared to hard surfaces. However, the reduced ceiling height and higher installation cost make this approach less practical for warehouse areas where the extra height and cost savings of other options prove more valuable.

    Many businesses use suspended ceilings in office and customer areas while leaving warehouse and shop spaces with an exposed or insulated structure, creating distinct zones appropriate to each area’s function.


    Flooring Solutions

    Your steel building foundation typically provides a concrete slab suitable for many commercial applications. However, specific uses may benefit from additional flooring treatments that improve functionality, appearance, or comfort.

    Sealed Concrete

    Basic sealed concrete represents the most economical flooring solution for commercial steel buildings. Professional concrete sealing using penetrating sealers or epoxy coatings protects the surface from moisture, staining, and wear while making the floor easier to clean.

    This approach works exceptionally well for warehouses, workshops, manufacturing facilities, and any operation involving heavy equipment or material handling. Modern concrete sealers can create attractive finishes in various colors while providing decades of low-maintenance service.

    The initial slab finishing quality significantly affects the final result. Properly finished and sealed concrete provides an excellent commercial floor at minimal additional cost beyond the foundation itself.

    Epoxy Coatings

    Epoxy floor coatings create durable, attractive surfaces that withstand heavy traffic, chemical exposure, and frequent cleaning. These coatings bond to concrete slabs, creating a seamless surface available in numerous colors and finishes.

    Epoxy floors work particularly well in food service facilities, retail spaces, showrooms, and anywhere requiring an attractive, easy-to-clean surface that handles commercial traffic. The coatings resist most chemicals, don’t harbor bacteria, and maintain their appearance through years of heavy use.

    Professional epoxy application costs more than basic sealing but less than other flooring options. The durability and low maintenance requirements often justify the investment for businesses where floor appearance and performance matter.

    Polished Concrete

    Mechanically polished concrete creates attractive, extremely durable floors increasingly popular in retail, restaurants, and commercial spaces seeking an industrial-modern aesthetic. The polishing process densifies the concrete surface while creating a glossy finish that requires minimal maintenance.

    Polished concrete offers excellent durability, easy cleaning, and an upscale appearance at a moderate cost. The reflective surface improves lighting efficiency while the dense surface resists moisture, staining, and wear better than untreated concrete.

    This option works particularly well when your steel building’s industrial character aligns with your brand or design concept. Modern commercial spaces often embrace the polished concrete aesthetic as both practical and stylish.

    Specialized Flooring Systems

    Certain operations require specific flooring solutions beyond sealed or coated concrete. Anti-static flooring for electronics manufacturing, food-grade flooring for processing facilities, or impact-resistant flooring for heavy manufacturing represent specialized applications where the right flooring system proves essential.

    These systems typically install over your concrete slab, adding functionality specific to your operational requirements. Working with your building manufacturer and flooring specialists during the planning phase ensures your foundation accommodates any specialized flooring requirements.


    Energy Efficiency and Long-Term Performance

    Interior finishing choices significantly impact operating costs. Proper insulation and air sealing can reduce energy consumption by 40-50% compared to poorly finished structures, with most commercial operations seeing payback periods of 3-5 years on insulation investment.

    Understanding how different insulation approaches work in steel buildings helps you balance upfront costs against long-term savings. Light-colored interior surfaces like white spray foam or light liner panels improve lighting efficiency by reflecting more light, with some operations reporting 20-30% reductions in lighting energy use from improved surface reflectivity alone.


    Common Interior Finishing Mistakes

    Underestimating insulation needs leads to uncomfortable working conditions and high energy costs. Most commercial operations in climate-controlled spaces benefit from higher insulation R-values than the minimum code requirements. The energy savings quickly justify the additional insulation investment.

    Inconsistent finishing approaches create visual discontinuity and can compromise performance. If you’re finishing office areas to high standards, plan appropriate transitions to less-finished zones rather than creating jarring boundaries between spaces.

    Ignoring acoustics in open commercial spaces creates uncomfortable noise levels affecting productivity and communication. Adding acoustic treatment costs far less than trying to fix noise problems after occupancy.

    Skipping vapor barriers in insulated spaces risks condensation problems that damage insulation and create moisture issues. Proper vapor barrier installation prevents problems that prove expensive and disruptive to correct later.

    Neglecting lighting planning until after interior finishing makes optimal lighting placement and electrical routing difficult. Plan your lighting layout while designing interior finishing to ensure efficient placement and proper electrical infrastructure.


    Frequently Asked Questions

    Can I finish my steel building interior to look like conventional construction?

    Yes, steel buildings support any interior finishing approach, including traditional framed walls, suspended ceilings, and standard flooring systems. Office areas, showrooms, and customer-facing spaces can be finished identically to conventional buildings. The steel structure simply provides a different framing system that supports the same interior finishes.

    Should I insulate my warehouse if it’s not climate-controlled?

    Even unheated warehouses benefit from roof insulation in most climates. Insulation reduces extreme temperature swings, prevents condensation that can damage stored materials, and makes the space more comfortable for workers. The moderate cost of basic insulation often proves worthwhile even without active climate control.

    How much does interior finishing typically cost?

    Interior finishing costs vary dramatically based on your choices. Basic sealed concrete floors with spray foam insulation might add $8-12 per square foot. Fully finished office-quality space with framed walls, suspended ceilings, and epoxy floors can cost $30-50 per square foot. Most commercial projects fall between these extremes, with mixed finishing levels averaging $15-25 per square foot.

    Can I finish the interior myself or hire separate contractors?

    Steel building interiors accommodate standard finishing trades and practices. You can hire conventional contractors for framing, insulation, drywall, and flooring work. Many building owners complete basic finishing themselves for simple applications like sealed concrete or basic insulation installation. Complex systems like spray foam typically require specialized contractors.

    Should I finish everything at once or phase the work?

    Phased finishing often makes sense for larger buildings or when budget constraints matter. Complete basic weatherproofing and any insulation that’s difficult to add later, then finish specific zones as needed or budget allows. This approach lets you occupy and use your building while completing finishing work in stages.


    Create Your Ideal Commercial Interior

    Steel building interiors accommodate any finishing level from basic to fully finished. Focus your budget on creating excellent conditions where they matter most while keeping overall costs reasonable. Work with qualified contractors who understand steel building construction to ensure your finishing systems integrate properly with your structure.

    Ready to start your steel building project? Contact us today to discuss your commercial building needs. Our steel building systems provide the durable, flexible framework that supports whatever interior finishing approach works best for your operation.

    From warehouses to retail spaces, MBMI delivers quality steel buildings that serve as the foundation for your commercial success.

  • Steel Building Foundation Guide: Types, Costs, and Requirements

    Steel Building Foundation Guide: Types, Costs, and Requirements

    Sarah’s 60×80 equipment storage building was three weeks from delivery when her contractor called with bad news. The foundation they’d planned wouldn’t work. The soil report revealed expansive clay requiring a completely different approach, adding $18,000 to the budget and delaying the project by six weeks.

    “Nobody told me I needed a soil test,” Sarah said. “I thought all foundations were basically the same.”

    They’re not. Your foundation represents roughly 15-25% of your total steel building project cost, and choosing the wrong type creates problems that are expensive to fix later. More importantly, your building’s structural warranty often depends on proper foundation design and installation.

    The good news? Understanding your foundation options before you break ground prevents costly surprises and ensures your steel building performs exactly as engineered for decades to come.

    Understanding Steel Building Foundation Requirements

    Steel buildings place different demands on foundations than traditional wood frame construction. The concentrated load points where columns meet the ground create specific engineering requirements that standard residential foundation approaches don’t always address properly.

    Every steel building foundation must accomplish three critical functions: distribute the building’s weight to prevent settling, resist uplift forces from wind and seismic activity, and maintain level support to preserve the building’s structural integrity. These aren’t just good practices; they’re essential for maintaining your manufacturer’s warranty and meeting building codes.

    The foundation requirements for your specific project depend on several factors. Your building’s size and intended use determine the load calculations. A 40×60 agricultural storage building creates very different foundation demands than a 100×200 manufacturing facility with heavy equipment and crane systems.

    Local soil conditions matter enormously. Sandy soils require a different foundation design than clay soils or bedrock. Areas with high water tables need additional drainage considerations. Regions experiencing freeze-thaw cycles must account for frost depth requirements to prevent heaving and cracking.

    Your climate zone affects more than just frost depth. Seismic zones require additional anchoring provisions. Hurricane-prone areas need foundations engineered for substantial uplift resistance. Snow load regions may require deeper footers to support the additional roof load during winter months.

    Building codes vary significantly by jurisdiction. Some municipalities accept engineer-stamped drawings without question. Others require extensive plan review and multiple inspections throughout the foundation installation process. Understanding your local requirements early prevents permit delays and ensures compliance.

    Foundation Types for Steel Buildings

    Choosing the right foundation type balances performance requirements, soil conditions, budget constraints, and construction timeline. Each foundation type offers distinct advantages and limitations worth understanding before you commit to one approach.

    Concrete Slab Foundation

    The concrete slab foundation represents the most common choice for steel buildings, and for good reason. A properly designed slab provides both the foundation and the floor system in a single pour, creating a cost-effective solution that works well for most applications.

    Design and Construction Details

    Monolithic slab designs combine the footer and floor into one continuous pour. These work exceptionally well in stable soil conditions and warmer climates without deep frost concerns. The integrated approach reduces labor costs and construction time while creating a smooth, level surface ready for immediate use.

    The slab typically requires 4-6 inches of thickness for most agricultural and commercial applications, though heavy equipment or vehicle traffic may justify 6-8 inches. Proper reinforcement using rebar or wire mesh prevents cracking as the concrete cures and settles. The edges thicken to 12-18 inches to create a footer that distributes the column loads effectively.

    Site Preparation and Installation

    Proper site preparation makes the difference between a slab that lasts decades and one that cracks within months. The site must be excavated to remove organic material and unstable soils. A compacted gravel base, typically 4-6 inches deep, provides drainage and prevents settlement. Vapor barriers beneath the concrete prevent moisture migration that can damage stored materials or create condensation issues inside the building.

    Modern slabs often incorporate insulation beneath the concrete in climate zones with significant heating or cooling requirements. This detail improves energy efficiency and comfort while preventing heat loss through the slab. The additional cost typically pays for itself through reduced utility bills over the building’s lifetime.

    Anchoring and Drainage Considerations

    Anchor bolts embedded in the slab perimeter secure the building’s base angle to the foundation. These bolts must be precisely positioned according to the manufacturer’s anchor bolt plan. Even small positioning errors can create installation challenges or compromise the building’s structural performance. Many contractors use templates or jigs to ensure accurate placement during the pour.

    Proper drainage around the slab prevents water accumulation that can undermine the foundation or create moisture problems inside the building. The site should slope away from the building in all directions. Gutters and downspouts should direct roof drainage well away from the foundation perimeter.

    Slab foundations work exceptionally well for most steel building applications. They provide excellent value, quick construction, and reliable performance when properly designed and installed. The main limitations involve challenging soil conditions or sites with significant slope, where alternative foundation types may prove more practical.

    Pier and Beam Foundation

    Pier and beam foundations elevate the building above ground level using concrete piers or poured columns that support the steel structure. This approach offers significant advantages in specific situations where slab foundations prove impractical or unnecessarily expensive.

    When Pier Foundations Make Sense

    The pier system places concrete supports directly beneath each column load point. These piers extend below the frost line and bear on stable soil or bedrock. The building’s steel columns attach to anchor bolts embedded in the pier tops, creating a solid connection that transfers loads efficiently.

    This foundation type excels in areas with problematic soils. Expansive clays that wreak havoc on slabs cause minimal issues with pier foundations since the piers can be designed to move slightly with soil expansion and contraction. Sites with high water tables or seasonal flooding benefit from the elevated design that keeps the building above potential water damage.

    Sloped sites often make pier foundations the most economical choice. Cutting and filling to create a level building pad for a slab foundation becomes expensive on steep terrain. Piers can accommodate grade changes efficiently, following the natural topography while maintaining proper building elevation.

    The elevated design creates a crawl space beneath the building that provides several benefits. Utilities can route through this space easily, simplifying plumbing, electrical, and HVAC installations. The airflow beneath the building reduces moisture accumulation and allows for natural ventilation. Future modifications or repairs become simpler when systems remain accessible.

    Design and Installation Requirements

    However, pier foundations require additional consideration for the floor system. Most applications need a separate floor structure, typically using wood joists and plywood decking or concrete slab on grade between the piers. This additional component adds cost compared to slab foundations where the floor and foundation integrate into one system.

    The spacing between piers depends on your building’s column spacing and load requirements. Typical spacing ranges from 20 to 40 feet, determined by your building’s engineering. Each pier requires excavation, forms, rebar reinforcement, and concrete placement. The labor-intensive process takes more time than pouring a single slab.

    Frost depth requirements still apply to pier foundations. In cold climates, piers must extend below the frost line to prevent heaving. This depth varies by location, from 12 inches in southern regions to 48 inches or more in northern climates. Local building codes specify the required depth for your area.

    Stem Wall Foundation

    Stem wall foundations combine elements of both slab and pier approaches, creating a hybrid system that works well in specific applications. This foundation type uses a continuous perimeter wall that sits on a concrete footer, with the interior floor area filled to create a slab surface.

    Construction Process

    The construction process begins with trenching around the building perimeter to the required depth for your climate and soil conditions. A concrete footer, typically 12-24 inches wide and 8-12 inches thick, pours in these trenches to create the base for the stem wall. Rebar reinforcement in the footer provides tensile strength and prevents cracking.

    The stem wall itself rises from the footer to the desired floor elevation. This wall is typically 8-12 inches wide, constructed using either poured concrete or concrete masonry units (CMU blocks). The height varies based on site conditions, grade requirements, and your preference for how far above ground level the building sits.

    Once the stem wall cures, the interior area fills with compacted gravel, and the floor slab pours inside the perimeter. This approach creates a monolithic floor similar to a standard slab foundation but with the added benefits of the elevated, reinforced perimeter wall.

    Advantages and Cost Considerations

    Stem wall foundations excel in areas with moderate frost concerns where a full basement isn’t necessary but some protection from frost heaving is desirable. The design also works well on slightly sloped sites where a stem wall can accommodate grade changes more easily than a monolithic slab.

    The perimeter wall provides excellent protection against water intrusion, creating a barrier between exterior grade and the interior floor. Proper waterproofing on the exterior wall face, combined with foundation drains, keeps water away from the building interior even in wet climates.

    This foundation type costs more than simple slab foundations due to the additional excavation, forming, and concrete work required for the stem wall. However, it typically costs less than pier and beam systems while offering some similar benefits. The additional expense often justifies itself in challenging site conditions or when the elevated perimeter provides specific advantages for your application.

    Foundation Cost Breakdown

    Understanding foundation costs helps you budget accurately and make informed decisions about design options. While every project differs based on size, location, and specific requirements, some general cost ranges provide useful planning guidance.

    Slab Foundation Costs

    Concrete slab foundations typically range from $4 to $8 per square foot for basic installations in straightforward soil conditions. A 60×80 building (4,800 square feet) might cost $19,200 to $38,400 for the slab foundation. This wide range reflects regional labor cost differences, concrete prices, and site-specific factors like accessibility and site preparation requirements.

    The basic slab cost includes site excavation, gravel base, vapor barrier, concrete, reinforcement, and finishing. Additional features increase the total cost. Thickened edges for heavy loads, perimeter insulation for energy efficiency, embedded radiant heating systems, and decorative finishes all add to the base price. Factor these options into your initial budget planning rather than discovering cost overruns during construction.

    Pier and Stem Wall Foundation Costs

    Pier and beam foundations cost varies with the number of piers required and the depth needed for your frost line and soil conditions. Individual piers typically cost $200 to $600 each including excavation, forms, concrete, and rebar. A building requiring 20 piers might need $4,000 to $12,000 just for the pier work. Add the cost of a separate floor system, and total foundation costs often exceed slab foundations by 30-50%.

    Stem wall foundations generally cost 25-40% more than simple slabs due to the additional forming, concrete, and labor. Using the same 60×80 building example, expect foundation costs between $24,000 and $48,000. The premium buys specific advantages in frost protection, water management, and grade accommodation.

    Site Conditions and Additional Expenses

    Site conditions dramatically affect foundation costs. Poor soils requiring removal and replacement, high water tables needing drainage systems, or rocky conditions requiring special excavation equipment all increase expenses significantly. Budget for a professional soil test early in planning. The $500-1,500 investment in soil testing often saves thousands by identifying problems before construction begins.

    Permitting and engineering fees add to foundation costs. Most jurisdictions require engineered foundation plans for commercial structures. Engineering fees typically range from $500 to $2,000 depending on project complexity. Building permits vary widely by location but generally cost 1-3% of construction value. Some areas also require separate foundation inspections at multiple stages, adding inspector fees to your budget.

    Regional factors create significant cost variations. Urban areas with higher labor rates and strict permitting processes typically cost more than rural areas. Areas with winter construction limitations may charge premium rates for cold-weather concrete work. Coastal regions often require additional engineering for soil and wind conditions, increasing design costs.

    Smart builders obtain multiple quotes from qualified concrete contractors. Price differences of 20-30% between contractors aren’t unusual. However, foundation work isn’t the place to automatically choose the lowest bidder. Poor foundation installation creates problems that cost far more to correct than you saved initially. Check references, verify proper licensing and insurance, and ensure contractors understand steel building foundation requirements specifically.

    Soil Testing and Site Preparation

    Your foundation’s performance depends heavily on what lies beneath it. Skipping proper soil testing ranks among the most common and costly mistakes in steel building construction. Professional soil analysis identifies conditions affecting foundation design and reveals potential problems before they become expensive failures.

    Understanding Soil Reports

    A geotechnical engineer conducts soil testing by taking samples at various depths across your building site. The testing analyzes soil composition, bearing capacity, moisture content, and expansion potential. The resulting soil report provides specific recommendations for foundation design, including required depths, reinforcement needs, and special provisions for challenging conditions.

    Soil bearing capacity determines how much weight the soil can support without excessive settlement. Sandy and gravelly soils typically offer excellent bearing capacity, often supporting 2,000-3,000 pounds per square foot or more. Clay soils vary dramatically, with some types supporting substantial loads while others compress significantly under weight. The soil report specifies the bearing capacity your foundation design must accommodate.

    Special Soil and Climate Considerations

    Expansive soils present particular challenges for steel buildings. These clay-based soils swell significantly when wet and shrink when dry, creating movement that can crack slabs, shift piers, and stress building connections. The soil report identifies expansion potential and recommends mitigation strategies like deeper foundations, flexible connections, or soil stabilization.

    High water tables require special attention in foundation design. Standing water or saturated soils reduce bearing capacity and can cause settlement issues. The foundation may need to extend deeper to reach more stable soil, or the design might incorporate drainage systems to lower the water table around the foundation. In extreme cases, the site may require filling to raise the building above problematic water levels.

    Frost depth requirements vary by climate zone. Soil expands when moisture freezes, creating powerful heaving forces that can lift and crack foundations. Your foundation must extend below the maximum frost penetration depth for your area. This depth ranges from zero in frost-free southern climates to 48 inches or more in northern regions. Local building codes specify required frost depths.

    Proper Site Preparation Steps

    Proper site preparation begins before concrete work starts. Clear the building area of vegetation, topsoil, and debris. Organic materials decompose over time, creating voids beneath foundations that lead to settlement. Remove all organic matter and unstable soils, replacing them with compacted structural fill when necessary.

    Rough grading establishes proper drainage patterns and creates the level building pad your foundation requires. The site should slope away from the building in all directions to prevent water accumulation. In some cases, swales or drainage systems may be necessary to manage water flow across the property.

    Compaction of base materials critically affects foundation performance. The gravel base beneath a slab foundation must be thoroughly compacted to prevent settlement. Each lift of gravel should be 4-6 inches thick and compacted to at least 95% of maximum density before adding the next lift. Renting a plate compactor or vibratory roller ensures proper compaction that hand tamping cannot achieve.

    Engineering and Code Compliance

    Steel building foundations require engineering that accounts for the unique load patterns and connection requirements of pre-engineered metal buildings. Your building manufacturer provides engineering drawings showing exact anchor bolt locations, load reactions at each column, and specific foundation requirements.

    Foundation Engineering Requirements

    The anchor bolt plan forms the critical connection between foundation and building. These drawings show precise dimensions locating each anchor bolt relative to the building’s grid lines. Position accuracy matters enormously because the building’s base angle must align perfectly with the anchor bolts during erection. Positioning errors of even an inch can prevent proper installation or create stress concentrations that affect structural performance.

    Foundation drawings specify concrete strength requirements, typically 3,000 to 4,000 PSI for most steel building applications. Higher strength concrete costs more but provides greater durability and load capacity. Understanding proper concrete mix design and curing procedures ensures your foundation meets these specifications. The specified strength isn’t optional; your building’s engineering assumes the foundation meets these requirements. Using lower strength concrete voids warranties and creates liability issues.

    Reinforcement specifications ensure the foundation resists cracking and distributes loads properly. Rebar placement, sizing, and spacing all follow engineering requirements. Wire mesh offers adequate reinforcement for light-duty slabs, but heavier applications require rebar grids. The steel reinforcement must be properly positioned within the concrete, typically 2-3 inches from the bottom surface for effective tension resistance.

    Local building codes overlay manufacturer requirements with additional jurisdiction-specific provisions. Some areas require deeper frost footings than standard engineering assumes. Seismic zones mandate special anchoring provisions. Hurricane regions need enhanced uplift resistance. Your foundation design must satisfy both the manufacturer’s engineering and local code requirements.

    Permits and Inspection Process

    The building permit process verifies code compliance before construction begins. Submit foundation plans to your local building department, allowing adequate time for review. Plan review can take anywhere from a few days to several weeks, depending on department workload and project complexity. Don’t schedule concrete work until you receive permit approval.

    Foundation inspections occur at specific construction stages. Most jurisdictions require inspection of excavation and formwork before concrete placement, ensuring proper depth, dimensions, and anchor bolt positioning. A second inspection verifies the completed foundation meets approved plans. Schedule inspections in advance and don’t proceed to the next construction phase until receiving approval.

    Working with qualified professionals ensures code compliance and proper engineering. Use concrete contractors experienced specifically with steel building foundations. The precise anchor bolt positioning and unique load patterns differ from residential work. Contractors familiar with metal buildings understand these requirements and avoid common installation errors.

    Consider hiring a third-party inspection service for additional quality assurance. These professional inspectors verify proper installation techniques, correct material usage, and compliance with engineering specifications. The modest cost often prevents expensive problems discovered during final building inspection or, worse, after the building is complete.

    Common Foundation Mistakes to Avoid

    Even with proper planning, certain mistakes occur frequently enough to warrant special attention. Avoiding these errors saves time, money, and frustration.

    Skipping soil testing to save a few hundred dollars often leads to foundation failures costing thousands to correct. Unknown soil conditions create problems that proper testing identifies before construction begins.

    Incorrect anchor bolt positioning prevents proper building alignment during erection. The steel structure can’t compensate for positioning errors. Use templates or jigs to ensure accuracy.

    Inadequate drainage allows water to undermine foundations and create interior moisture problems. Grade sites to slope away from buildings and install proper roof drainage systems.

    Using lower concrete strength than specified compromises load capacity and durability. Always order the specified strength and verify with delivery tickets.

    Insufficient base compaction leads to settlement and cracking. Thoroughly compact each lift of gravel base before adding more material.

    Ignoring frost depth requirements causes foundation heaving in cold climates. Extend footings below maximum frost penetration depth as specified by local codes.

    Starting without permits creates legal liability and can require removing completed work. Always obtain proper permits before beginning foundation work.

    Poor construction timing in extreme weather affects concrete curing. Plan foundation work for appropriate conditions and use proper hot-weather or cold-weather concrete practices when necessary.

    Frequently Asked Questions

    Do I really need a soil test for my steel building foundation?

    Yes, professional soil testing is essential for proper foundation design. Soil conditions vary dramatically even within small areas, and unexpected problems like expansive clay or poor bearing capacity can cause foundation failures. The $500-1,500 investment in soil testing often prevents thousands in repair costs by identifying issues before construction begins.

    How thick should my concrete slab be for a steel building?

    Most agricultural and light commercial steel buildings require 4-6 inches of concrete slab thickness. Buildings with heavy equipment, vehicle traffic, or substantial storage loads may need 6-8 inches. Your building’s engineering specifies the required thickness based on your intended use and load requirements. The thickened perimeter footer is typically 12-18 inches deep to distribute column loads properly.

    Can I use an existing slab for my new steel building?

    Existing slabs can work if they meet several criteria. The slab must be level, structurally sound without significant cracking or settlement, properly sized for your new building, and have anchor points positioned to match your building’s column layout. Most existing slabs don’t meet all requirements, particularly the critical anchor bolt positioning. Have your building manufacturer’s engineer evaluate the existing slab before assuming it’s suitable.

    What’s the difference between a monolithic slab and a floating slab?

    A monolithic slab combines the footer and floor into one continuous pour, with thickened edges around the perimeter that extend below frost line. A floating slab sits on top of the ground on a gravel base without deep footers. Monolithic slabs work for most steel building applications in stable soils. Floating slabs may be suitable for temporary structures or very light buildings in frost-free climates but typically aren’t appropriate for permanent steel buildings.

    How long does concrete need to cure before building erection?

    Concrete reaches approximately 70% of its final strength in seven days and 90% in 28 days. Most steel building erection can proceed safely after 7-10 days of curing in normal weather conditions. However, anchor bolts must not be disturbed during curing, and any column loads should wait until the concrete reaches adequate strength. Your building manufacturer and concrete contractor can provide specific timing recommendations for your project.

    Do I need a vapor barrier under my concrete slab?

    Yes, vapor barriers are essential beneath concrete slabs to prevent moisture migration from the ground into your building. Place a 6-mil polyethylene sheet or specialized vapor barrier over the compacted gravel base before pouring concrete. Overlap seams by 12 inches and seal with tape. This simple step prevents condensation problems and protects stored materials from ground moisture.

    Make Your Foundation Decision With Confidence

    Your steel building deserves a foundation engineered for long-term performance and value. The choices you make during foundation planning affect your building’s structural integrity, warranty compliance, and total project cost.

    Start by obtaining professional soil testing to understand your site conditions. Work with your building manufacturer’s engineering team to design a foundation appropriate for your specific application. Choose qualified contrSteel Building Foundation Guide: Types, Costs, and Requirements

    Sarah’s 60×80 equipment storage building was three weeks from delivery when her contractor called with bad news. The foundation they’d planned wouldn’t work. The soil report revealed expansive clay requiring a completely different approach, adding $18,000 to the budget and delaying the project by six weeks.

    “Nobody told me I needed a soil test,” Sarah said. “I thought all foundations were basically the same.”

    They’re not. Your foundation represents roughly 15-25% of your total steel building project cost, and choosing the wrong type creates problems that are expensive to fix later. More importantly, your building’s structural warranty often depends on proper foundation design and installation.

    The good news? Understanding your foundation options before you break ground prevents costly surprises and ensures your steel building performs exactly as engineered for decades to come.


    Understanding Steel Building Foundation Requirements

    Steel buildings place different demands on foundations than traditional wood frame construction. The concentrated load points where columns meet the ground create specific engineering requirements that standard residential foundation approaches don’t always address properly.

    Every steel building foundation must accomplish three critical functions: distribute the building’s weight to prevent settling, resist uplift forces from wind and seismic activity, and maintain level support to preserve the building’s structural integrity. These aren’t just good practices; they’re essential for maintaining your manufacturer’s warranty and meeting building codes.

    The foundation requirements for your specific project depend on several factors. Your building’s size and intended use determine the load calculations. A 40×60 agricultural storage building creates very different foundation demands than a 100×200 manufacturing facility with heavy equipment and crane systems.

    Local soil conditions matter enormously. Sandy soils require a different foundation design than clay soils or bedrock. Areas with high water tables need additional drainage considerations. Regions experiencing freeze-thaw cycles must account for frost depth requirements to prevent heaving and cracking.

    Your climate zone affects more than just frost depth. Seismic zones require additional anchoring provisions. Hurricane-prone areas need foundations engineered for substantial uplift resistance. Snow load regions may require deeper footers to support the additional roof load during winter months.

    Building codes vary significantly by jurisdiction. Some municipalities accept engineer-stamped drawings without question. Others require extensive plan review and multiple inspections throughout the foundation installation process. Understanding your local requirements early prevents permit delays and ensures compliance.


    Foundation Types for Steel Buildings

    Choosing the right foundation type balances performance requirements, soil conditions, budget constraints, and construction timeline. Each foundation type offers distinct advantages and limitations worth understanding before you commit to one approach.

    Concrete Slab Foundation

    The concrete slab foundation represents the most common choice for steel buildings, and for good reason. A properly designed slab provides both the foundation and the floor system in a single pour, creating a cost-effective solution that works well for most applications.

    Design and Construction Details

    Monolithic slab designs combine the footer and floor into one continuous pour. These work exceptionally well in stable soil conditions and warmer climates without deep frost concerns. The integrated approach reduces labor costs and construction time while creating a smooth, level surface ready for immediate use.

    The slab typically requires 4-6 inches of thickness for most agricultural and commercial applications, though heavy equipment or vehicle traffic may justify 6-8 inches. Proper reinforcement using rebar or wire mesh prevents cracking as the concrete cures and settles. The edges thicken to 12-18 inches to create a footer that distributes the column loads effectively.

    Site Preparation and Installation

    Proper site preparation makes the difference between a slab that lasts decades and one that cracks within months. The site must be excavated to remove organic material and unstable soils. A compacted gravel base, typically 4-6 inches deep, provides drainage and prevents settlement. Vapor barriers beneath the concrete prevent moisture migration that can damage stored materials or create condensation issues inside the building.

    Modern slabs often incorporate insulation beneath the concrete in climate zones with significant heating or cooling requirements. This detail improves energy efficiency and comfort while preventing heat loss through the slab. The additional cost typically pays for itself through reduced utility bills over the building’s lifetime.

    Anchoring and Drainage Considerations

    Anchor bolts embedded in the slab perimeter secure the building’s base angle to the foundation. These bolts must be precisely positioned according to the manufacturer’s anchor bolt plan. Even small positioning errors can create installation challenges or compromise the building’s structural performance. Many contractors use templates or jigs to ensure accurate placement during the pour.

    Proper drainage around the slab prevents water accumulation that can undermine the foundation or create moisture problems inside the building. The site should slope away from the building in all directions. Gutters and downspouts should direct roof drainage well away from the foundation perimeter.

    Slab foundations work exceptionally well for most steel building applications. They provide excellent value, quick construction, and reliable performance when properly designed and installed. The main limitations involve challenging soil conditions or sites with significant slope, where alternative foundation types may prove more practical.

    Pier and Beam Foundation

    Pier and beam foundations elevate the building above ground level using concrete piers or poured columns that support the steel structure. This approach offers significant advantages in specific situations where slab foundations prove impractical or unnecessarily expensive.

    When Pier Foundations Make Sense

    The pier system places concrete supports directly beneath each column load point. These piers extend below the frost line and bear on stable soil or bedrock. The building’s steel columns attach to anchor bolts embedded in the pier tops, creating a solid connection that transfers loads efficiently.

    This foundation type excels in areas with problematic soils. Expansive clays that wreak havoc on slabs cause minimal issues with pier foundations since the piers can be designed to move slightly with soil expansion and contraction. Sites with high water tables or seasonal flooding benefit from the elevated design that keeps the building above potential water damage.

    Sloped sites often make pier foundations the most economical choice. Cutting and filling to create a level building pad for a slab foundation becomes expensive on steep terrain. Piers can accommodate grade changes efficiently, following the natural topography while maintaining proper building elevation.

    The elevated design creates a crawl space beneath the building that provides several benefits. Utilities can route through this space easily, simplifying plumbing, electrical, and HVAC installations. The airflow beneath the building reduces moisture accumulation and allows for natural ventilation. Future modifications or repairs become simpler when systems remain accessible.

    Design and Installation Requirements

    However, pier foundations require additional consideration for the floor system. Most applications need a separate floor structure, typically using wood joists and plywood decking or concrete slab on grade between the piers. This additional component adds cost compared to slab foundations where the floor and foundation integrate into one system.

    The spacing between piers depends on your building’s column spacing and load requirements. Typical spacing ranges from 20 to 40 feet, determined by your building’s engineering. Each pier requires excavation, forms, rebar reinforcement, and concrete placement. The labor-intensive process takes more time than pouring a single slab.

    Frost depth requirements still apply to pier foundations. In cold climates, piers must extend below the frost line to prevent heaving. This depth varies by location, from 12 inches in southern regions to 48 inches or more in northern climates. Local building codes specify the required depth for your area.

    Stem Wall Foundation

    Stem wall foundations combine elements of both slab and pier approaches, creating a hybrid system that works well in specific applications. This foundation type uses a continuous perimeter wall that sits on a concrete footer, with the interior floor area filled to create a slab surface.

    Construction Process

    The construction process begins with trenching around the building perimeter to the required depth for your climate and soil conditions. A concrete footer, typically 12-24 inches wide and 8-12 inches thick, pours in these trenches to create the base for the stem wall. Rebar reinforcement in the footer provides tensile strength and prevents cracking.

    The stem wall itself rises from the footer to the desired floor elevation. This wall is typically 8-12 inches wide, constructed using either poured concrete or concrete masonry units (CMU blocks). The height varies based on site conditions, grade requirements, and your preference for how far above ground level the building sits.

    Once the stem wall cures, the interior area fills with compacted gravel, and the floor slab pours inside the perimeter. This approach creates a monolithic floor similar to a standard slab foundation but with the added benefits of the elevated, reinforced perimeter wall.

    Advantages and Cost Considerations

    Stem wall foundations excel in areas with moderate frost concerns where a full basement isn’t necessary but some protection from frost heaving is desirable. The design also works well on slightly sloped sites where a stem wall can accommodate grade changes more easily than a monolithic slab.

    The perimeter wall provides excellent protection against water intrusion, creating a barrier between exterior grade and the interior floor. Proper waterproofing on the exterior wall face, combined with foundation drains, keeps water away from the building interior even in wet climates.

    This foundation type costs more than simple slab foundations due to the additional excavation, forming, and concrete work required for the stem wall. However, it typically costs less than pier and beam systems while offering some similar benefits. The additional expense often justifies itself in challenging site conditions or when the elevated perimeter provides specific advantages for your application.


    Foundation Cost Breakdown

    Understanding foundation costs helps you budget accurately and make informed decisions about design options. While every project differs based on size, location, and specific requirements, some general cost ranges provide useful planning guidance.

    Slab Foundation Costs

    Concrete slab foundations typically range from $4 to $8 per square foot for basic installations in straightforward soil conditions. A 60×80 building (4,800 square feet) might cost $19,200 to $38,400 for the slab foundation. This wide range reflects regional labor cost differences, concrete prices, and site-specific factors like accessibility and site preparation requirements.

    The basic slab cost includes site excavation, gravel base, vapor barrier, concrete, reinforcement, and finishing. Additional features increase the total cost. Thickened edges for heavy loads, perimeter insulation for energy efficiency, embedded radiant heating systems, and decorative finishes all add to the base price. Factor these options into your initial budget planning rather than discovering cost overruns during construction.

    Pier and Stem Wall Foundation Costs

    Pier and beam foundations cost varies with the number of piers required and the depth needed for your frost line and soil conditions. Individual piers typically cost $200 to $600 each including excavation, forms, concrete, and rebar. A building requiring 20 piers might need $4,000 to $12,000 just for the pier work. Add the cost of a separate floor system, and total foundation costs often exceed slab foundations by 30-50%.

    Stem wall foundations generally cost 25-40% more than simple slabs due to the additional forming, concrete, and labor. Using the same 60×80 building example, expect foundation costs between $24,000 and $48,000. The premium buys specific advantages in frost protection, water management, and grade accommodation.

    Site Conditions and Additional Expenses

    Site conditions dramatically affect foundation costs. Poor soils requiring removal and replacement, high water tables needing drainage systems, or rocky conditions requiring special excavation equipment all increase expenses significantly. Budget for a professional soil test early in planning. The $500-1,500 investment in soil testing often saves thousands by identifying problems before construction begins.

    Permitting and engineering fees add to foundation costs. Most jurisdictions require engineered foundation plans for commercial structures. Engineering fees typically range from $500 to $2,000 depending on project complexity. Building permits vary widely by location but generally cost 1-3% of construction value. Some areas also require separate foundation inspections at multiple stages, adding inspector fees to your budget.

    Regional factors create significant cost variations. Urban areas with higher labor rates and strict permitting processes typically cost more than rural areas. Areas with winter construction limitations may charge premium rates for cold-weather concrete work. Coastal regions often require additional engineering for soil and wind conditions, increasing design costs.

    Smart builders obtain multiple quotes from qualified concrete contractors. Price differences of 20-30% between contractors aren’t unusual. However, foundation work isn’t the place to automatically choose the lowest bidder. Poor foundation installation creates problems that cost far more to correct than you saved initially. Check references, verify proper licensing and insurance, and ensure contractors understand steel building foundation requirements specifically.


    Soil Testing and Site Preparation

    Your foundation’s performance depends heavily on what lies beneath it. Skipping proper soil testing ranks among the most common and costly mistakes in steel building construction. Professional soil analysis identifies conditions affecting foundation design and reveals potential problems before they become expensive failures.

    Understanding Soil Reports

    A geotechnical engineer conducts soil testing by taking samples at various depths across your building site. The testing analyzes soil composition, bearing capacity, moisture content, and expansion potential. The resulting soil report provides specific recommendations for foundation design, including required depths, reinforcement needs, and special provisions for challenging conditions.

    Soil bearing capacity determines how much weight the soil can support without excessive settlement. Sandy and gravelly soils typically offer excellent bearing capacity, often supporting 2,000-3,000 pounds per square foot or more. Clay soils vary dramatically, with some types supporting substantial loads while others compress significantly under weight. The soil report specifies the bearing capacity your foundation design must accommodate.

    Special Soil and Climate Considerations

    Expansive soils present particular challenges for steel buildings. These clay-based soils swell significantly when wet and shrink when dry, creating movement that can crack slabs, shift piers, and stress building connections. The soil report identifies expansion potential and recommends mitigation strategies like deeper foundations, flexible connections, or soil stabilization.

    High water tables require special attention in foundation design. Standing water or saturated soils reduce bearing capacity and can cause settlement issues. The foundation may need to extend deeper to reach more stable soil, or the design might incorporate drainage systems to lower the water table around the foundation. In extreme cases, the site may require filling to raise the building above problematic water levels.

    Frost depth requirements vary by climate zone. Soil expands when moisture freezes, creating powerful heaving forces that can lift and crack foundations. Your foundation must extend below the maximum frost penetration depth for your area. This depth ranges from zero in frost-free southern climates to 48 inches or more in northern regions. Local building codes specify required frost depths.

    Proper Site Preparation Steps

    Proper site preparation begins before concrete work starts. Clear the building area of vegetation, topsoil, and debris. Organic materials decompose over time, creating voids beneath foundations that lead to settlement. Remove all organic matter and unstable soils, replacing them with compacted structural fill when necessary.

    Rough grading establishes proper drainage patterns and creates the level building pad your foundation requires. The site should slope away from the building in all directions to prevent water accumulation. In some cases, swales or drainage systems may be necessary to manage water flow across the property.

    Compaction of base materials critically affects foundation performance. The gravel base beneath a slab foundation must be thoroughly compacted to prevent settlement. Each lift of gravel should be 4-6 inches thick and compacted to at least 95% of maximum density before adding the next lift. Renting a plate compactor or vibratory roller ensures proper compaction that hand tamping cannot achieve.


    Engineering and Code Compliance

    Steel building foundations require engineering that accounts for the unique load patterns and connection requirements of pre-engineered metal buildings. Your building manufacturer provides engineering drawings showing exact anchor bolt locations, load reactions at each column, and specific foundation requirements.

    Foundation Engineering Requirements

    The anchor bolt plan forms the critical connection between foundation and building. These drawings show precise dimensions locating each anchor bolt relative to the building’s grid lines. Position accuracy matters enormously because the building’s base angle must align perfectly with the anchor bolts during erection. Positioning errors of even an inch can prevent proper installation or create stress concentrations that affect structural performance.

    Foundation drawings specify concrete strength requirements, typically 3,000 to 4,000 PSI for most steel building applications. Higher strength concrete costs more but provides greater durability and load capacity. Understanding proper concrete mix design and curing procedures ensures your foundation meets these specifications. The specified strength isn’t optional; your building’s engineering assumes the foundation meets these requirements. Using lower strength concrete voids warranties and creates liability issues.

    Reinforcement specifications ensure the foundation resists cracking and distributes loads properly. Rebar placement, sizing, and spacing all follow engineering requirements. Wire mesh offers adequate reinforcement for light-duty slabs, but heavier applications require rebar grids. The steel reinforcement must be properly positioned within the concrete, typically 2-3 inches from the bottom surface for effective tension resistance.

    Local building codes overlay manufacturer requirements with additional jurisdiction-specific provisions. Some areas require deeper frost footings than standard engineering assumes. Seismic zones mandate special anchoring provisions. Hurricane regions need enhanced uplift resistance. Your foundation design must satisfy both the manufacturer’s engineering and local code requirements.

    Permits and Inspection Process

    The building permit process verifies code compliance before construction begins. Submit foundation plans to your local building department, allowing adequate time for review. Plan review can take anywhere from a few days to several weeks, depending on department workload and project complexity. Don’t schedule concrete work until you receive permit approval.

    Foundation inspections occur at specific construction stages. Most jurisdictions require inspection of excavation and formwork before concrete placement, ensuring proper depth, dimensions, and anchor bolt positioning. A second inspection verifies the completed foundation meets approved plans. Schedule inspections in advance and don’t proceed to the next construction phase until receiving approval.

    Working with qualified professionals ensures code compliance and proper engineering. Use concrete contractors experienced specifically with steel building foundations. The precise anchor bolt positioning and unique load patterns differ from residential work. Contractors familiar with metal buildings understand these requirements and avoid common installation errors.

    Consider hiring a third-party inspection service for additional quality assurance. These professional inspectors verify proper installation techniques, correct material usage, and compliance with engineering specifications. The modest cost often prevents expensive problems discovered during final building inspection or, worse, after the building is complete.


    Common Foundation Mistakes to Avoid

    Even with proper planning, certain mistakes occur frequently enough to warrant special attention. Avoiding these errors saves time, money, and frustration.

    Skipping soil testing to save a few hundred dollars often leads to foundation failures costing thousands to correct. Unknown soil conditions create problems that proper testing identifies before construction begins.

    Incorrect anchor bolt positioning prevents proper building alignment during erection. The steel structure can’t compensate for positioning errors. Use templates or jigs to ensure accuracy.

    Inadequate drainage allows water to undermine foundations and create interior moisture problems. Grade sites to slope away from buildings and install proper roof drainage systems.

    Using lower concrete strength than specified compromises load capacity and durability. Always order the specified strength and verify with delivery tickets.

    Insufficient base compaction leads to settlement and cracking. Thoroughly compact each lift of gravel base before adding more material.

    Ignoring frost depth requirements causes foundation heaving in cold climates. Extend footings below maximum frost penetration depth as specified by local codes.

    Starting without permits creates legal liability and can require removing completed work. Always obtain proper permits before beginning foundation work.

    Poor construction timing in extreme weather affects concrete curing. Plan foundation work for appropriate conditions and use proper hot-weather or cold-weather concrete practices when necessary.


    Frequently Asked Questions

    Do I really need a soil test for my steel building foundation?

    Yes, professional soil testing is essential for proper foundation design. Soil conditions vary dramatically even within small areas, and unexpected problems like expansive clay or poor bearing capacity can cause foundation failures. The $500-1,500 investment in soil testing often prevents thousands in repair costs by identifying issues before construction begins.

    How thick should my concrete slab be for a steel building?

    Most agricultural and light commercial steel buildings require 4-6 inches of concrete slab thickness. Buildings with heavy equipment, vehicle traffic, or substantial storage loads may need 6-8 inches. Your building’s engineering specifies the required thickness based on your intended use and load requirements. The thickened perimeter footer is typically 12-18 inches deep to distribute column loads properly.

    Can I use an existing slab for my new steel building?

    Existing slabs can work if they meet several criteria. The slab must be level, structurally sound without significant cracking or settlement, properly sized for your new building, and have anchor points positioned to match your building’s column layout. Most existing slabs don’t meet all requirements, particularly the critical anchor bolt positioning. Have your building manufacturer’s engineer evaluate the existing slab before assuming it’s suitable.

    What’s the difference between a monolithic slab and a floating slab?

    A monolithic slab combines the footer and floor into one continuous pour, with thickened edges around the perimeter that extend below frost line. A floating slab sits on top of the ground on a gravel base without deep footers. Monolithic slabs work for most steel building applications in stable soils. Floating slabs may be suitable for temporary structures or very light buildings in frost-free climates but typically aren’t appropriate for permanent steel buildings.

    How long does concrete need to cure before building erection?

    Concrete reaches approximately 70% of its final strength in seven days and 90% in 28 days. Most steel building erection can proceed safely after 7-10 days of curing in normal weather conditions. However, anchor bolts must not be disturbed during curing, and any column loads should wait until the concrete reaches adequate strength. Your building manufacturer and concrete contractor can provide specific timing recommendations for your project.

    Do I need a vapor barrier under my concrete slab?

    Yes, vapor barriers are essential beneath concrete slabs to prevent moisture migration from the ground into your building. Place a 6-mil polyethylene sheet or specialized vapor barrier over the compacted gravel base before pouring concrete. Overlap seams by 12 inches and seal with tape. This simple step prevents condensation problems and protects stored materials from ground moisture.


    Make Your Foundation Decision With Confidence

    Your steel building deserves a foundation engineered for long-term performance and value. The choices you make during foundation planning affect your building’s structural integrity, warranty compliance, and total project cost.

    Start by obtaining professional soil testing to understand your site conditions. Work with qualified engineers to design a foundation appropriate for your specific application. Choose experienced contractors familiar with steel building foundations, and ensure all work receives proper permits and inspections.

    Ready to start planning your steel building project? Contact MBMI today for a consultation about your commercial steel building needs. Our team can discuss your project requirements and connect you with the right resources to ensure your building performs exactly as designed for decades to come.From agricultural buildings to commercial warehouses, our steel building company provides the systems that serve as the foundation for your success.

  • Commercial Steel Buildings vs Tilt-Up Construction: Pros, Cons, and Use Cases

    Commercial Steel Buildings vs Tilt-Up Construction: Pros, Cons, and Use Cases

    When planning a commercial structure, one of the first critical decisions developers face is the construction method. The two most common systems in large-scale commercial construction are commercial steel buildings vs. tilt-up construction.

    Both methods are proven, but each has distinct strengths, challenges, and suitability depending on project requirements. Your choice affects not only upfront cost and construction speed but also long-term performance, flexibility, and total cost of ownership.


    What is Tilt-Up Construction?

    Tilt-up construction involves casting large concrete wall panels horizontally on the building site itself. Once cured, these panels are “tilted” upright using cranes and braced into position. The remaining structure (roof framing, interior framing, doors, and finishes) is then completed around these walls.

    This method is often favored for projects that require large, simple footprints with smooth concrete exterior walls, such as warehouses, distribution centers, and large retail stores.

    However, tilt-up relies heavily on weather conditions, site access, and precise sequencing. The panels must cure properly on-site, which can extend timelines during periods of rain, cold, or humidity. Additionally, tilt-up requires large work areas for laying out and casting panels and heavy equipment for lifting them into place.


    What is a Pre-Engineered Commercial Steel Building?

    Pre-engineered commercial steel buildings (PEMBs) are systems where the building’s frame, roof, and wall panels are fabricated in a factory before being shipped to the jobsite. These buildings arrive ready for efficient assembly by a trained erection crew, reducing on-site labor time and minimizing weather-related delays.

    PEMBs are incredibly versatile and are commonly used for warehouses, manufacturing facilities, service centers, agricultural structures, and flexible multi-use spaces. At MBMI, we design pre-engineered buildings that are highly customizable, allowing owners to tailor dimensions, framed openings, insulation packages, and finishes to their specific operational needs.


    Pros and Cons of Tilt-Up Construction

    Tilt-up construction has several clear advantages. The solid concrete walls provide inherent fire resistance and durability and are capable of supporting large clear spans for open interior spaces. The smooth concrete finish may appeal to developers seeking a minimalist, modern exterior aesthetic.

    However, there are drawbacks. The concrete panels require substantial, reinforced foundations to support their weight, which adds to cost and complexity. Tilt-up is also more labor-intensive on-site, with many steps dependent on perfect weather conditions. Any rain, excessive heat, or humidity can delay the curing process or complicate pours, pushing timelines out.

    Another limitation is flexibility: once complete, a tilt-up structure is difficult and expensive to modify or expand. Future renovations involving additional doors, windows, or changes to wall configurations often require specialized demolition and patchwork that detracts from the clean original design.


    Pros and Cons of Commercial Steel Buildings

    Pre-engineered commercial steel buildings deliver a compelling set of benefits for commercial owners and developers. One of the most important advantages is speed of construction. Since components are fabricated off-site in controlled conditions, erection can begin immediately upon delivery. Construction timelines are predictable and shorter, which reduces total labor costs.

    Steel buildings also require lighter foundations due to the material’s superior strength-to-weight ratio. This reduces excavation and concrete requirements, making steel a preferred option for sites with challenging soil conditions or where foundation costs could escalate.

    Design flexibility is another hallmark of steel buildings. Framed openings can be located almost anywhere in the structure, interior layouts can be reconfigured easily, and expansions are relatively simple. Many owners plan for future additions at the outset.

    That said, steel buildings do have some limitations. The exterior finish may require architectural cladding if a premium aesthetic is desired, adding to cost. And like all metal buildings, they must be properly sealed and maintained to prevent corrosion over the long term.

    Overall, when comparing commercial steel buildings vs tilt-up construction, steel buildings typically offer faster delivery, lower construction costs, and greater adaptability for changing business needs.


    Factors to Consider When Choosing

    Choosing between these two systems requires careful thought about your project’s specific needs.

    If your timeline is compressed, a steel building’s rapid fabrication and efficient assembly will help meet your schedule. If labor costs or weather variability are concerns, steel’s off-site prefabrication reduces exposure to those risks.

    If aesthetics demand smooth concrete finishes or local fire codes require certain wall assemblies, tilt-up may make sense. But if your project could benefit from future expansion or needs a building envelope that can adapt over time, steel is far superior.

    Cost is a critical consideration. Steel buildings often offer a lower total installed cost, not only because of shorter construction times but also due to savings on foundations and smaller on-site crews. Tilt-up can be more expensive upfront, especially when soil conditions or weather issues demand additional work.

    Finally, think about the building’s future. Can your structure serve your needs today and adapt as those needs change? In many cases, steel’s flexibility makes it the better investment over time.


    Why Steel is Often the Smarter Choice

    In many commercial applications, pre-engineered steel buildings deliver faster return on investment thanks to reduced construction times, lower labor costs, and adaptability for future growth.

    Where tilt-up construction excels in large-scale, permanent warehouses or distribution centers with strict fire-resistance requirements and no anticipated modifications, steel buildings dominate when speed, flexibility, and scalability matter.

    MBMI’s steel buildings can be tailored to meet both aesthetic and performance needs, incorporating high-quality trim and flashing, insulation packages, and architectural options that ensure lasting performance.


    Final Thought

    The decision between commercial steel buildings vs tilt-up construction is more than a cost comparison. It’s about selecting a system that fits your project’s timeline, budget, site conditions, and long-term business goals.

    For most commercial and industrial applications, steel buildings deliver a smarter, faster, and more flexible solution. When you need guidance on your next project, MBMI’s team is ready to help you design a structure that meets your needs today and can evolve with you tomorrow.

    Contact MBMI today to discuss your options and get expert advice tailored to your project requirements.

  • Top Design Priorities for Energy Efficient Commercial Steel Buildings

    Top Design Priorities for Energy Efficient Commercial Steel Buildings

    Smart strategies for lower operating costs and long-term building performance

    Energy efficient commercial steel buildings are no longer a luxury. They’re a necessity. As energy codes tighten and utility costs rise, businesses are looking for smarter ways to reduce operational expenses and environmental impact. That begins with the right design.

    At our prefabricated commercial metal building company, energy performance isn’t an afterthought. It’s built into our systems from the ground up, starting with structural planning and continuing through component selection. This guide outlines what matters most when designing a steel building that performs efficiently for decades.

    Why Energy Efficiency Starts with Steel Building Design

    Most energy-saving opportunities are won or lost in the planning phase. Once a building is up, retrofitting systems or upgrading materials becomes more expensive and disruptive. That’s why MBMI Metal Buildings prioritizes performance from the beginning.

    Energy efficient commercial steel buildings take advantage of design flexibility to minimize waste, maximize insulation, and reduce unnecessary heating or cooling needs. Choosing the right size, shape, and orientation can improve airflow and solar performance, all while supporting your business goals.

    Insulation Is the First Line of Defense

    No feature affects thermal performance more than insulation. The right insulation system will help regulate temperature, improve indoor air quality, and reduce HVAC costs across seasons.

    Popular commercial insulation options include:

    • Blanket insulation: Cost-effective and easy to install, ideal for roofs and walls
    • Rigid board: High R-value per inch, best for moisture-prone areas or walls
    • Spray foam: Seals gaps and penetrations, excellent for air tightness and irregular surfaces

    At MBMI, we offer tailored insulation packages based on regional climate and building use. Whether you’re building a warehouse, office, or showroom, we help you reach optimal R-values without overspending.

    Learn more about commercial insulation standards from the U.S. Department of Energy, and check out our guide to commercial steel building insulation.

    Roof Coatings and Wall Panels: Reflectivity and Durability Matter

    Cool roofing strategies can reduce the temperature inside your building by up to 30 degrees in warm climates. That translates to significant savings on air conditioning.

    MBMI offers Galvalume+ roof panels as a standard feature. These panels:

    • Reflect solar radiation
    • Offer a 25-year warranty against rust and degradation
    • Resist chalking and fading
    • Require minimal maintenance

    Combined with light-colored coatings or reflective membranes, they help your building maintain a stable internal temperature, especially important for large-span commercial spaces.

    Sealed Entries and Fully Insulated Walk Doors

    Doors are one of the most overlooked sources of energy loss. MBMI walk doors come fully insulated and weather-sealed as standard, not as a costly upgrade.

    Our doors feature:

    • Factory-installed insulation cores
    • High-quality weatherstripping
    • Pre-installed hardware and rust-resistant finishes

    This reduces thermal transfer, minimizes drafts, and helps maintain internal climate conditions without overworking your HVAC system.

    Ventilation, Natural Light, and Interior Climate Control

    Steel buildings that breathe well perform better. Ventilation and lighting choices impact not just energy use but occupant comfort and productivity.

    Energy-efficient ventilation strategies include:

    • Ridge vents to release rising heat
    • Wall louvers for passive airflow
    • Exhaust fans to manage indoor air quality

    When it comes to lighting, translucent wall panels and well-placed windows reduce the need for artificial light. MBMI can include these in your framing plans to optimize daylight without compromising insulation or security.

    Smart Site Orientation and Shading Strategies

    The position of your building relative to the sun makes a surprising difference. South-facing walls receive more solar exposure in North America, which can be beneficial or problematic depending on your climate.

    Strategies to consider:

    • Orient longer sides east-west to minimize solar gain
    • Use roof overhangs or sunshades to block heat during summer
    • Plant deciduous trees that provide seasonal shade

    These passive design elements are especially important for offices or retail spaces where human comfort is a top priority.

    The MBMI Advantage: Built-In Efficiency

    Energy efficient commercial steel buildings aren’t built by accident. They result from purposeful design, quality components, and an understanding of real-world performance. MBMI makes this easy by including many high-efficiency features as standard:

    • Galvalume+ reflective roof and wall panels
    • Fully insulated walk doors
    • Premium trim and weather seals
    • Insulation support and climate-specific recommendations
    • Ventilation accessories and daylighting options

    Our in-house engineering team also ensures that your building meets or exceeds local energy codes from day one.

    Final Thought

    Energy efficiency starts with smart design. From insulation and ventilation to site orientation and high-performance components, MBMI is committed to helping clients build structures that last longer and cost less to operate.

    Want help designing your next energy efficient commercial steel building? Contact MBMI to start the process with a partner who delivers more than just materials.